
This is to the best of my knowledge, as of October 2021.
-Bennett
Recipe at the top instead of hearing my life story first? Sure thing.
- Import https://github.com/honeycombio/buildevents/ into Azure DevOps or at least fork it on GitHub since Azure DevOps won’t build a repo you don’t control
- Create Nuget feed in Azure Artifacts to use as your org’s Chocolatey package repository
- Create Azure Pipeline for generating the chocolatey package and publishing it
name: $(Rev:.r)
pool:
  name: Azure Pipelines
  vmImage: windows-2022
steps:
- powershell: |
   $latestGitTag = git describe --tags --abbrev=0
   $baseVersionNumber = $latestGitTag.Replace("v","")
   write-host $latestGitTag
   write-host $baseVersionNumber
   write-host $(Build.BuildNumber)
   Write-Host "##vso[build.updatebuildnumber]$baseVersionNumber$(Build.BuildNumber)"
  displayName: 'Set build number including latest git tag'
- task: Go@0
  displayName: 'go build'
  inputs:
    command: build
    arguments: '-o "$(Build.BinariesDirectory)\buildevents.exe"'
    workingDirectory: '$(Build.SourcesDirectory)'
- powershell: |
   cd $(Build.ArtifactStagingDirectory)
   write-host "about to run choco new"
   choco new buildevents --version $(Build.BuildNumber)
   copy $(Build.BinariesDirectory)\*.* $(Build.ArtifactStagingDirectory)\buildevents\tools
   del $(Build.ArtifactStagingDirectory)\buildevents\tools\chocolateybeforemodify.ps1
   del $(Build.ArtifactStagingDirectory)\buildevents\tools\chocolateyinstall.ps1
   del $(Build.ArtifactStagingDirectory)\buildevents\tools\chocolateyuninstall.ps1
   write-host "about to run choco pack"
   cd $(Build.ArtifactStagingDirectory)\buildevents
   choco pack
   dir $(Build.ArtifactStagingDirectory)\buildevents\*.nupkg
  displayName: 'Package build'
- task: NuGetCommand@2
  displayName: 'NuGet push'
  inputs:
    command: push
    packagesToPush: '$(Build.ArtifactStagingDirectory)/**/*.nupkg;!$(Build.ArtifactStagingDirectory)/**/*.symbols.nupkg'
    nuGetFeedType: 'internal'
    publishVstsFeed: 'a GUID/another GUID'
    # Azure DevOps YAML pipeline editor UI helps determine this value
So you’re a DevOps Engineer or a Developer who wants to use an open source tool at work but the authors don’t distribute Windows binaries. You want to add it to other dev machines and/or build agents at work, not just your own machine, and you want that to be convenient to do. Being a developer that mainly does closed-source work you’re not super comfortable with open source collaboration and to be honest you want to solve this today on your timetable not put in a request for the team to distribute Windows binaries.
As luck would have it the tool you’re looking at compiles cleanly on your local machine with no elaborate setup – this cherry-picked example is a golang executable after all. If only you had a convenient way to distribute it internally to your company….
Thankfully, your org has Azure DevOps and you’re already using Azure Artifacts to host internal Nuget and npm feeds for your shared libraries. If you’re not, now’s a great time to start since Azure DevOps is freemium.
Chocolatey, the self-defined “package manager for windows”, adds additional functionality on a normal Nuget v2 feed. Paul Broadwith wrote a terrific blog post on how to Build a Chocolatey Package Repository using Azure DevOps Artifacts Feed. That’s what we’re going to do to publish this tool.
The broad strokes, no pun intended, are that we’re going to:
- Create a feed in Azure (DevOps) Artifacts
- Push nupkg files to it from Azure (DevOps) Pipelines
- Set up the Nuget v2 URL for it as a Chocolatey package source on destination machines
- Install the tool on those machines using Chocolatey
- ????
- Profit
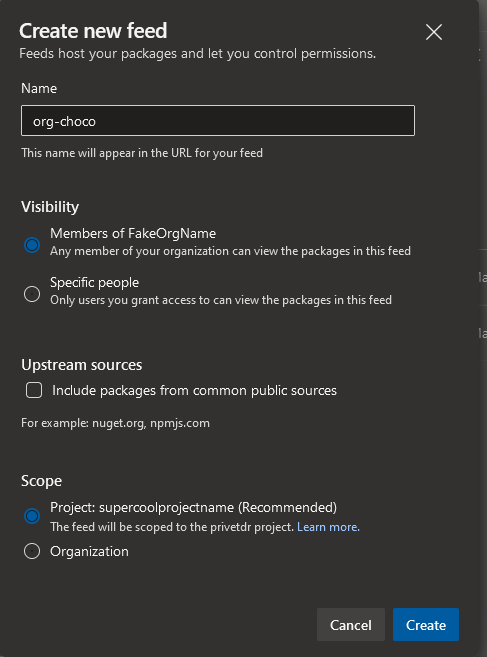
Create Feed
- Go to the Artifacts section of Azure DevOps.
- Click Create Feed.
- Use the defaults except uncheck Upstream sources. That feature only knows about nuget.org and npmjs.com, not anything to do with Chocolatey.
Acquire Code
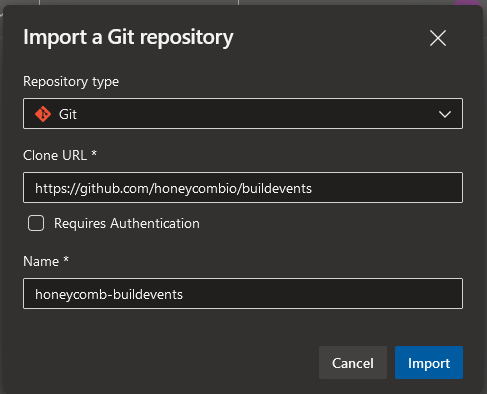
Azure DevOps does a lot of helpful things but the one thing I haven’t been able to convince it to do is build the source code of public GitHub repos I do not own. It does support building from a forked or imported copy of the repo though. In this post we will use an imported copy of the repo since that more closely reflects the security posture of many organizations that use Azure DevOps: they’ll let you import code from GitHub but they’re not ready to setup an ongoing connection with the site lol.
- Go to the Repos section of Azure DevOps.
- From the repos drop list at the top, select Import repository.
- Enter
https://github.com/honeycombio/buildeventsfor the Clone URL. - Enter
honeycomb-buildeventsfor the repo Name. - Click Import.
Build Package
We’re going to use a YAML pipeline for this next section. The classic graphical pipeline builder works just as well if that’s your preference. Using a YAML pipeline however you can copy-paste the entire snippet at the top of this post and use it with minimal configuration. That and YAML-based pipelines is great for your confidence and CV.
- Go to the Pipelines section and click New pipeline.
- Connect step: Select Azure Repos Git.
- Select step: Select the
honeycomb-buildeventsrepo imported above. - Configure step: Select
Starter pipeline. - Review step: Replace what’s there with the snippet at the top of this page.
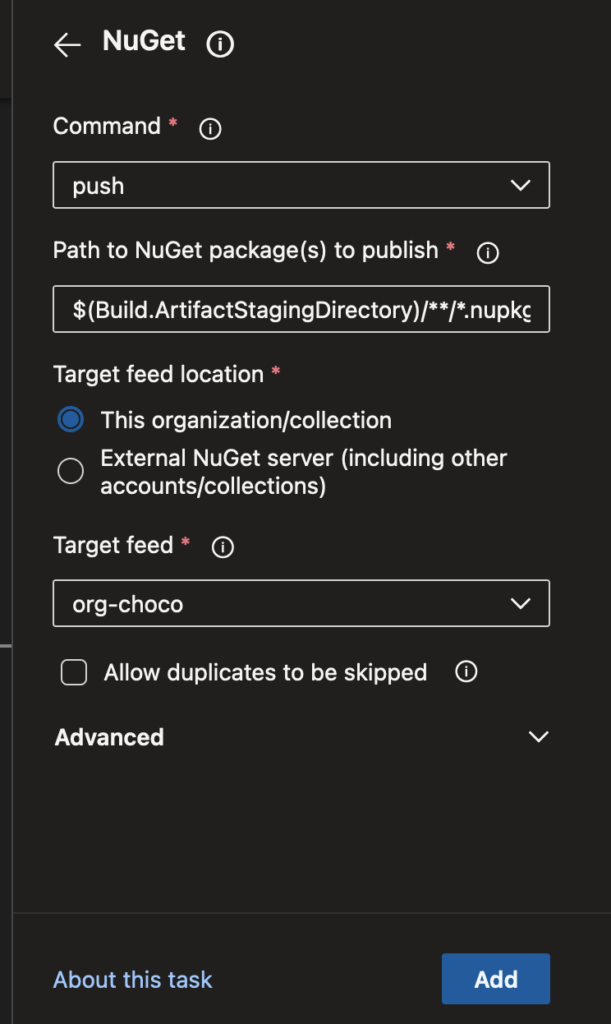
- Remove the ‘NuGet push’ step. We will replace it with one that has the needed feed GUIDs. Unfortunately the task editor assistant does not yet support updating tasks, only adding new ones with the latest values in the UI.
- Place your cursor on a new line after the ‘Package build’ step. Be sure to not indent it. Blank space is meaningful in YAML.
- Open the editor assistant by clicking the
Show assistentbutton off to the right of the YAML text field. - Filter by nuget to find the Nuget task and click it.
- In Command select
push. - In
Target feed, select the feed name created above. - The other defaults work since they pick up any nupkg file in the Build.ArtifactStagingDirectory on the build agent.
- Click Add to add the task to the YAML pipeline where your cursor was placed in step 7 above. If the editor shows red error squiggly lines then check that task has the proper indentation.
- task: NuGetCommand@2show have no characters to the left of it.inputs:should have only 2 spaces to the left of it. The fields under that should have only 4 space to the left of them. - Click
Save and runto open the Save dialog, thenSave and runagain to commit the YAML pipeline file to the main branch. - If the build succeeds, go to the Artifacts section and find the new package version.
Choices made in this pipeline
As of this writing Honeycomb Build Events is at version 0.6.0. Nuget and Azure Artifacts supports 3 and 4 segment version numbers. With builds running disconnected from the original GitHub project repo it makes sense in my opinion to have Azure DevOps builds be a sub-version of the latest tag the main project is at. Our first build in Azure DevOps will be 0.6.0.1, then 0.6.0.2, and so on.
To get that auto-incrementing revision we set the build name.
name: $(Rev:.r)Azure DevOps provides hosted build agents with a smorgasbord of pre-installed build dependencies. We’re going to take advantage of the latest Windows image.
pool:
  name: Azure Pipelines
  vmImage: windows-2022
Next, under the steps list, we run Powershell to set the full build name with a prefix of the latest version that was tagged in Git. $(Build.BuildNumber) grabs the dot some revision number of each build we set above. We combine that with the latest Git tag, stripped of any v prefix. Then we write pieces of the build name to the build log output so it’s easy to check out work. Then we run the strange ##vso syntax for setting a pipeline-wide variable.
- powershell: |
   $latestGitTag = git describe --tags --abbrev=0
   $baseVersionNumber = $latestGitTag.Replace("v","")
   write-host $latestGitTag        # just for us to see in the log
   write-host $baseVersionNumber   # just for us to see in the log
   write-host $(Build.BuildNumber) # just for us to see in the log
   Write-Host "##vso[build.updatebuildnumber]$baseVersionNumber$(Build.BuildNumber)"
  displayName: 'Set build number including latest git tag'
The next step is reasonably straightforward. We build the golang code into a binary, specifying exactly where the source code is and where and what the output exe should be.
- task: Go@0
  displayName: 'go build'
  inputs:
    command: build
    arguments: '-o "$(Build.BinariesDirectory)\buildevents.exe"'
    workingDirectory: '$(Build.SourcesDirectory)'
This next part packages that exe into a Chocolatey package.
- Go into the folder where artifacts get staged.
- Create a new Chocolatey package using the command line tool (
choco new), setting the version in the config file to the same version number as this build number. - Copy everything from the binaries output directory into the tools folder of that new Chocolatey package.
- Delete the three install-step-related Powershell files of the default package template since we just want Chocolatey to add the exe in the package to the PATH of the system.
- Run
choco packto zip up the package and create the nupkg file. - Then a
dircommand to show the file was created in case we need to troubleshoot.
- powershell: |
   cd $(Build.ArtifactStagingDirectory)
   write-host "about to run choco new"
   choco new buildevents --version $(Build.BuildNumber)

   # note: some of these lines may appear wrapped
   #       the copy source destination cmds are each one line

   copy $(Build.BinariesDirectory)\*.* $(Build.ArtifactStagingDirectory)\buildevents\tools
   del $(Build.ArtifactStagingDirectory)\buildevents\tools\chocolateybeforemodify.ps1
   del $(Build.ArtifactStagingDirectory)\buildevents\tools\chocolateyinstall.ps1
   del $(Build.ArtifactStagingDirectory)\buildevents\tools\chocolateyuninstall.ps1
   write-host "about to run choco pack"
   cd $(Build.ArtifactStagingDirectory)\buildevents
   choco pack
   dir $(Build.ArtifactStagingDirectory)\buildevents\*.nupkg
  displayName: 'Package build'
Finally we have the Nuget Push step which you used the editor assistant earlier to set the GUIDs for.
- task: NuGetCommand@2
  displayName: 'NuGet push'
  inputs:
    command: push
    packagesToPush: '$(Build.ArtifactStagingDirectory)/**/*.nupkg;!$(Build.ArtifactStagingDirectory)/**/*.symbols.nupkg'
    nuGetFeedType: 'internal'
    publishVstsFeed: 'a GUID/another GUID'
Consume Package
Now we have a Chocolatey package for Honeycomb Build Events published to our Azure Artifacts feed org-choco. How do we consume it?
- Add the feed (with authentication) as a Chocolatey source on the destination machine.
- Specify the source name in the Chocolatey package install step. I prefer feed names and source names to be the same and to both be something short but descriptive I wouldn’t mind typing at the command prompt.
Real quick what that’ll look like:
choco source add -n=org-choco -s="https://pkgs.dev.azure.com/YOUR AZURE DEVOPS ORG NAME/YOUR AZURE DEVOPS PROJECT NAME/_packaging/YOUR FEED NAME THE PACKAGE WAS PUBLISHED TO/nuget/v2" -u="the user account email address" -p="the PAT created below"

choco install buildevents -s org-choco -y
To create a Personal Access Token for feed access, go to the settings menu in the upper right-hand corner of Azure DevOps and navigate to Personal Access Tokens. If they moved the UI around by the time you read this, it should still be at https://dev.azure.com/YOURORGNAME/_usersSettings/tokens if you want to go directly there.
- Click
New token. - Under scopes select
custom defined. - Make sure nothing else is checked except
Readunder thePackagingsection. - Give it a good name that’ll spark your memory when you get the reminder email this token is expiring soon and you should remember to renew it. I chose “shared token for org-choco package read”.
- On the
Successdialog it gives you the PAT. Write this down and save it somewhere. That’s your last chance to get that specific PAT. If you lose it you may need a new one. If you plan on just distributing it as part of achoco source addcommand in a wiki then write it down there. If you plan on only using it in build pipelines or some other automated fashion where it’s secret and not shared with the user (a script run by Group Policy maybe), I’d recommend writing it down in notepad.
Note: Personal Access Tokens are tied to a specific user in Azure DevOps. Any Azure DevOps user that has access to the package in Artifacts would be able to create and use their own PAT for this. This “create a limited-access PAT you can use multiple places like build pipelines” strategy works until the user that created the PAT lets it expire, whether because they missed the notification email or because they left the company.
Wrap Up
Having run the choco source add command for the feed and the choco install command for buildevents, that executable should now be on your path and available to run.
If you have any questions, please reach out to me on Twitter. I’ll help where time permits.